|
|
| (66 intermediate revisions by 4 users not shown) |
| Line 1: |
Line 1: |
| | {{#customtitle:Patients Module|My Title}} |
| | |
| = Overview = | | = Overview = |
| | | |
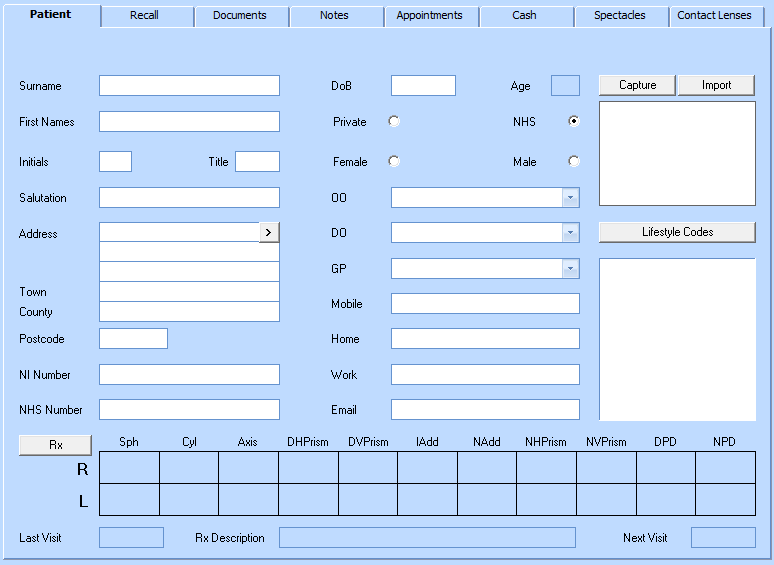
| The Patients screen is used to manage all information that directly relates to you patients. | | The Patients screen is used to manage all information that directly relates to your patients. |
|
| |
|
| When you open Optisoft it will display a blank Patient record, open on the main details tab.
| | <center>https://www.optisoft.co.uk/wiki/images/Optisoft/Patients/BlankPatients.png</center> |
|
| |
|
| At this point you can either enter a new patient record, or you can retrieve and modify/review the details of existing patients.
| | When you open Optisoft Enterprise it will display a blank Patient record, in the Patient Records Module. |
|
| |
|
| = Creating a New Patient = | | At this point you can either enter a new patient record, or you can retrieve the details of existing patients. |
| | |
| | = Using Patients = |
| | == Creating a New Patient == |
|
| |
|
| Adding a new patient is simply a matter of typing their details into the relevant box, working your way through the tabs from left to right. | | Adding a new patient is simply a matter of typing their details into the relevant box, working your way through the tabs from left to right. |
|
| |
|
| == Patients Tab ==
| | *[[Using Patients - Patients Tab|Patients Tab]] |
| | |
| | *[[Using Patients - Recall Tab|Recall Tab]] |
|
| |
|
| *Start by entering the patient’s '''Surname''', '''First Names''' and '''Title'''. The '''Initial''' and '''Salutation''' boxes will auto-complete based on the details entered into these three. | | *[[Using Patients - Documents Tab|Documents Tab]] |
|
| |
|
| *Enter the address details for the patient. If you have purchased the postcode facility then you can enter the patients '''Postcode''' and then click the <ICON> to automatically fill in the address details. | | *[[Using Patients - Notes Tab|Notes Tab]] |
|
| |
|
| *The '''NHS Number''' and '''National Insurance Number''' fields are not required fields but, obviously, provide useful information. | | *[[Using Patients - Appointments Tab|Appointments Tab]] |
|
| |
|
| *When you enter the patient’s '''Date of Birth''' you will see that Optisoft automatically calculates the patient’s current '''age'''. | | *[[Using Patients - Cash Tab|Cash Tab]] |
|
| |
|
| *Select the appropriate radio button for '''Private/NHS''' and patient '''Gender'''. | | *[[Using Patients - Spectacles Tab|Spectacles Tab]] |
|
| |
|
| *The '''O.O.''', '''D.O.''' and '''GP''' fields can only be filled in if you have entered Staff and GP details on to the system. To find out how to do this see Opticians: Adding/Amending and Doctors: Adding/Amending | | *[[Using Patients - Contact Lenses Tab|Contact Lenses Tab]] |
|
| |
|
| *Enter the patient’s contact numbers into the appropriate field. The mobile telephone number will be used by the SMS messaging module if it has been installed.
| |
|
| |
|
| *Enter the patient’s email address into the appropriate field if they have one. This address will be used by the E-Mail messaging module if it has been installed.
| | ==Finding Patients== |
| | |
| | There are a number of ways to find a patient within Optisoft Enterprise. |
|
| |
|
| *You can enter a patient '''Reference''' in the field provided. You can also set the system to automatically assign a reference number, or choose not to use reference numbers at all in the Patient Module Maintenance. | | *[[Finding Patients - Search Box|Using the Search Box]] |
|
| |
|
| *You can add a patient’s photo to their record, either by using a webcam or by importing an image from a file. | | *[[Finding Patients - Built In Lists|Built-In Lists]] |
|
| |
|
| *You can assign pre-set [[Patients#Lifestyle_Codes|'''Lifestyle Codes''']] to a patient’s record. These can be patient history information, i.e. Glaucoma, Diabetic etc, marketing information, i.e. spending habits, hobbies, profession, or any other information that may be of use. | | *[[Finding Patients - Active Patient List|Active Patient List]] |
|
| |
|
| *The patient’s last prescription is displayed at the bottom of the Patient tab. See Rx: Adding/Amending for more information.
| |
|
| |
|
| *The Last Visit field is automatically updated by the Appointments module when the patient’s appointment has been attended.
| | You can also filter the results of your searches. |
|
| |
|
| *The Next Visit field is automatically updated by the Recall module. Based on your Recall Categories it will display the next point at which you have chosen to remind the patient. So, for example, if the patient has been sent their first recall letter and has not responded, this field will display the date at which their second recall letter is due to be sent. | | *[[Finding Patients - Filtering Searches|Filtering Searches]] |
|
| |
|
| === Family Members ===
| |
|
| |
|
| If the patient that you are creating is a family member of an existing patient you can save time entering details by using the Family button.
| | ==Active Patients== |
| Ensure that you have the patient whose relation you are entering selected, see Finding Patients for information on searching for patients, and then click on the Family button.
| |
| This will create a new patient record but will automatically insert the address details and home telephone from the related record. You then would simply fill in the remaining fields.
| |
|
| |
|
| === Patient’s Prescription ===
| | Active Patients is a new feature that has been introduced into Optisoft Enterprise Edition. |
|
| |
|
| The patient’s last prescription is displayed at the bottom of the Patient tab in the Patient’s Record screen.
| | |
| Optisoft retains all of the patient’s previous prescription details for future reference. | | https://www.optisoft.co.uk/wiki/images/Optisoft/Shared/ActivePatientList.jpg |
|
| |
|
| ==== Adding a New Prescription ====
| |
|
| |
|
| New patient prescriptions can be either be entered manually or can be imported automatically from the OptomNotes application.
| | |
|
| |
|
| To manually enter a new prescription you would use the following procedure.
| | It is designed to keep a list of the patients that the user is currently working with, enabling you to quickly switch between patients rather than having to search for the patient every time you wish to perform an action. |
|
| |
|
| On the Patient tab within the Patient’s screen click on the <ICON> button to open the prescription screen. You will see that this screen provides more information than the summary on the Patient tab.
| |
| Click on the New button on the toolbar. If this is the patient’s first prescription this step is not necessary.
| |
| Optisoft automatically selects today’s date for the new prescription. You can select another date by using the dropdown calendar or by simply typing in the desired date into the Date field.
| |
| You can select the name of the optometrist who performed the examination using the O.O. dropdown box. See Opticians: Adding/Amending for details on adding staff members to this dropdown. When the prescription is saved this field will update the corresponding field on the Patient tab.
| |
| Enter a description into the Description field. This will help you identify the prescription in the future.
| |
| Enter the patient’s prescription details into the appropriate fields.
| |
| If the field has a dropdown arrow you can click this to provide you with a list of standard values.
| |
| You can also click into any of the fields and use the cursor (arrow) keys on the keyboard to scroll through a list of suitable values, for example the Sphere field provides a list of measurements at 0.25 intervals.
| |
| You can enter a comment into the Comment field at the bottom of the Rx sceeen. Anything entered into this field will be saved for use on future prescriptions and will appear on the dropdown list here.
| |
| Clicking on the Transpose button on the toolbar will automatically transpose the prescription details.
| |
| Clicking on the Two Adds button on the toolbar will display the Intermediate Add field if the prescription requires it.
| |
| Clicking on the BOZR/TD button on the toolbar will display the BOZR and TD fields if the prescription requires them.
| |
| Once you have added the prescription to your satisfaction, click the Save button to save and close the prescription.
| |
|
| |
|
| ==== Viewing Existing Prescriptions ==== | | ===Using Active Patients=== |
|
| |
|
| Optisoft retains all of the previously entered prescription details for a patient and they can be viewed through the Prescription screen in the Patient’s module. | | The name of the current Active Patient is displayed in the top right of Optisoft Enterprise. This is the patient you are currently working with and so will be automatically selected when you enter a module. |
|
| |
|
| To view an existing prescription for the selected patient you would follow the below procedure. | | There is a dropdown arrow alongside the active patient’s name. Clicking on this will show the list of other patients within the active list, if there are any, and also the options to have No Active Patient or Clear Active Patients, which will blank the list completely. |
| | |
| | To select another patient from this list and make them the active patient you would simply click once on their name. |
| | |
| | Next to the dropdown arrow there is a red cross, this is used to ‘close’ the currently active patient and remove them from the Active Patients list. |
| | |
| | |
| | *[[Active Patients - Adding Active Patients|Adding Patients to the List]] |
| | |
| | *[[Active Patients - Removing Active Patients|Removing Patients from the List]] |
| | |
| | |
| | ==OptomNotes Integration== |
| | |
| | |
| | Optisoft Enterprise can be integrated with the OptomNotes application, passing patient details in both directions, saving you from having to enter the same information into both systems manually. |
| | |
| | |
| | https://www.optisoft.co.uk/wiki/images/Optisoft/Shared/OptomNotesButton.png |
| | |
| | |
| | ===Sending Patients to OptomNotes=== |
| | |
| | To send a patient to OptomNotes you need to make sure that the patient is currently selected as the active patient. |
| | You would then click on the Send to OptomNotes button on the toolbar in the Patient module. |
| | This opens a window allowing you to select the optometrist to pass the patient to. |
| | |
|
| |
|
| Click on the Rx button on the Patient tab to open the Prescription screen.
| | <center>https://www.optisoft.co.uk/wiki/images/Optisoft/Shared/OptomNotesSelectOptom.png</center> |
| The Prescription screen will open with the patient’s latest prescription details in it.
| |
| You can view a list of all previous prescriptions by clicking on the Built-In Lists option underneath the search box. You can then select desired prescription and click OK to view it’s details within the main prescription screen.
| |
| Alternately, you can use the search box itself to locate the previous prescription, for example if you enter the date of the previous entry it will locate this for you.
| |
|
| |
|
| ==== Editing an Existing Prescription ====
| |
|
| |
|
| You can edit an existing prescription in Optisoft. This will, obviously, change the details if saved so care sure be taken to avoid mistakes here.
| | If the optometrist is currently logged in to their OptomNotes application their name will appear as an option within this list. |
| To edit the patient’s latest prescription you would simply click on the Rx button to open the Prescription screen. You would then update the prescription here, clicking the Save button to permanently save the changes.
| | If there are no optometrists currently logged in then the only option will be Next Free O.O. |
| To edit a previous prescription you would follow the procedure described in Viewing Existing Prescriptions to locate the desired prescription. Then, once the chosen prescription is displayed in the Prescription screen, make the desired changes. Again, clicking Save will permanently save any changes you have made.
| | Make your selection and click the button to add the patient to the OptomNotes application. |
|
| |
|
| ==== Deleting an Existing Prescription ====
| |
|
| |
|
| You can permanently delete a prescription from Optisoft. This will, of course, mean that the prescription information is no longer available to the patient record. The delete function should, therefore, be used with care.
| | ===Information from OptomNotes=== |
|
| |
|
| To delete a patient’s prescription you would firstly locate the prescription by follow the procedure detailed in Viewing Existing Prescriptions.
| | When the optometrist has completed their examination, OptomNotes will send the patient’s updated prescription and recall information back to Optisoft Enterprise. |
| Once the prescription to be deleted is displayed within the Prescription screen, click the Delete button to delete the prescription record from the patient.
| |
|
| |
|
| === Patient Photo ===
| | The patient’s record in Optisoft Enterprise will be updated automatically with these new details. |
|
| |
|
| You can add a patient’s photo to their record so that it displays on the Patient tab of their record.
| | =Setting Up Patients= |
| If you have a webcam installed you capture the image directly by following the procedure below.
| |
| Click on the Capture button, this will attempt to connect to the camera.
| |
| The image window on the Patient tab will display the camera’s image.
| |
| When you are happy with the image, click the Capture button again to capture the image.
| |
| Click Save to save the image to the patient’s record.
| |
|
| |
|
| If you do not have a webcam you can still attach images to the patient record.
| | Some of the details that you will be using in the Patient Records module require some setting up beforehand. |
| You will need to acquire an image of the patient and save it as either a Bitmap (BMP) or JPEG (JPG) file on your computer.
| |
| Once you have the image saved you can click on the Import button on the patient’s details tab. This will open a dialog box allowing you to locate the saved image and attach it to the patient’s record.
| |
|
| |
|
| === Lifestyle Codes ===
| | They will also require maintenance during the system’s life, for example optometrist’s details may change as the practice grows. |
|
| |
|
| Lifestyle Codes can be used to add extra information to a patient’s record either for marketing purposes or simply as extra background information relating to the patient.
| | [[Setting Up Patients - Maintaining the Patient Module|Maintaining the Patient Module]] |
| They can be useful to quickly adding medical history data, such as Glaucoma or Diabetes, or patient spending habits or hobbies.
| |
| Codes assigned to a patient allow you to generate lists of patients who fall into certain groups that can be used as a basis for targeting patients for a mailshot.
| |
|
| |
|
| ==== Assigning Lifestyle Codes ====
| |
|
| |
|
| Before you can start you must set up your list of available Lifestyle Codes, see Lifestyle Codes: Adding/Amending
| |
|
| |
|
| To add Lifestyle Codes to a patient record, do the following.
| | [[Main Page|Home]] |
| Click on the <ICON> button to open the Lifestyle Codes screen.
| |
| Select the desired radio button on the left hand side to select the category of code.
| |
| Click on the Lifestyle Code you wish to add to the patient record.
| |
| Left click the <ICON> button.
| |
| You can repeat this process as many times as necessary.
| |
| Once you have added the desired Lifestyle Codes you must click the Save button to save the details.
| |
{{#customtitle:Patients Module|My Title}}
Overview
The Patients screen is used to manage all information that directly relates to your patients.
When you open Optisoft Enterprise it will display a blank Patient record, in the Patient Records Module.
At this point you can either enter a new patient record, or you can retrieve the details of existing patients.
Using Patients
Creating a New Patient
Adding a new patient is simply a matter of typing their details into the relevant box, working your way through the tabs from left to right.
Finding Patients
There are a number of ways to find a patient within Optisoft Enterprise.
You can also filter the results of your searches.
Active Patients
Active Patients is a new feature that has been introduced into Optisoft Enterprise Edition.
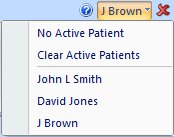
It is designed to keep a list of the patients that the user is currently working with, enabling you to quickly switch between patients rather than having to search for the patient every time you wish to perform an action.
Using Active Patients
The name of the current Active Patient is displayed in the top right of Optisoft Enterprise. This is the patient you are currently working with and so will be automatically selected when you enter a module.
There is a dropdown arrow alongside the active patient’s name. Clicking on this will show the list of other patients within the active list, if there are any, and also the options to have No Active Patient or Clear Active Patients, which will blank the list completely.
To select another patient from this list and make them the active patient you would simply click once on their name.
Next to the dropdown arrow there is a red cross, this is used to ‘close’ the currently active patient and remove them from the Active Patients list.
OptomNotes Integration
Optisoft Enterprise can be integrated with the OptomNotes application, passing patient details in both directions, saving you from having to enter the same information into both systems manually.

Sending Patients to OptomNotes
To send a patient to OptomNotes you need to make sure that the patient is currently selected as the active patient.
You would then click on the Send to OptomNotes button on the toolbar in the Patient module.
This opens a window allowing you to select the optometrist to pass the patient to.
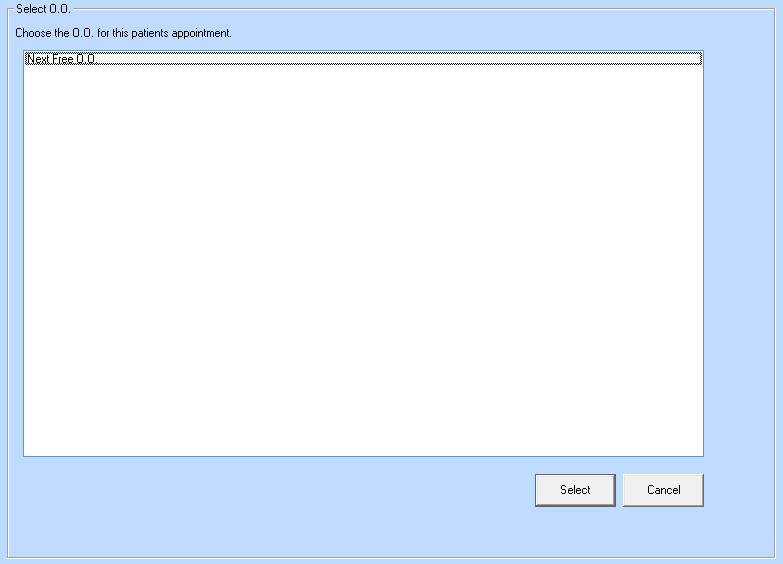
If the optometrist is currently logged in to their OptomNotes application their name will appear as an option within this list.
If there are no optometrists currently logged in then the only option will be Next Free O.O.
Make your selection and click the button to add the patient to the OptomNotes application.
Information from OptomNotes
When the optometrist has completed their examination, OptomNotes will send the patient’s updated prescription and recall information back to Optisoft Enterprise.
The patient’s record in Optisoft Enterprise will be updated automatically with these new details.
Setting Up Patients
Some of the details that you will be using in the Patient Records module require some setting up beforehand.
They will also require maintenance during the system’s life, for example optometrist’s details may change as the practice grows.
Maintaining the Patient Module
Home